Opening a Smart Action Form
Very often, you will need to ask user inputs before triggering the logic behind a Smart Action.For example, you might want to specify a reason if you want to block a user account. Or set the amount to charge a user’s credit card.
- SQL
- Mongoose
- Rails
- Django
- Laravel
On our Live Demo example, we’ve defined 4 input fields on the Smart Action
Upload Legal Docs on the collection companies.const { collection } = require('forest-express-sequelize');
collection('companies', {
actions: [
{
name: 'Upload Legal Docs',
type: 'single',
fields: [
{
field: 'Certificate of Incorporation',
description:
'The legal document relating to the formation of a company or corporation.',
type: 'File',
isRequired: true,
},
{
field: 'Proof of address',
description:
'(Electricity, Gas, Water, Internet, Landline & Mobile Phone Invoice / Payment Schedule) no older than 3 months of the legal representative of your company',
type: 'File',
isRequired: true,
},
{
field: 'Company bank statement',
description: 'PDF including company name as well as IBAN',
type: 'File',
isRequired: true,
},
{
field: 'Valid proof of ID',
description:
'ID card or passport if the document has been issued in the EU, EFTA, or EEA / ID card or passport + resident permit or driving license if the document has been issued outside the EU, EFTA, or EEA of the legal representative of your company',
type: 'File',
isRequired: true,
},
],
},
],
});
const { PermissionMiddlewareCreator } = require('forest-express-sequelize');
const permissionMiddlewareCreator = new PermissionMiddlewareCreator('companies');

...

router.post('/actions/upload-legal-docs', permissionMiddlewareCreator.smartAction(),
  (req, res) => {
    // Get the current company id
    let companyId = req.body.data.attributes.ids[0];

    // Get the values of the input fields entered by the admin user.
    let attrs = req.body.data.attributes.values;
    let certificate_of_incorporation = attrs['Certificate of Incorporation'];
    let proof_of_address = attrs['Proof of address'];
    let company_bank_statement = attrs['Company bank statement'];
    let passport_id = attrs['Valid proof of id'];

    // The business logic of the Smart Action. We use the function
    // UploadLegalDoc to upload them to our S3 repository. You can see the full
    // implementation on our Forest Live Demo repository on Github.
    return P.all([
      uploadLegalDoc(companyId, certificate_of_incorporation, 'certificate_of_incorporation_id'),
      uploadLegalDoc(companyId, proof_of_address, 'proof_of_address_id'),
      uploadLegalDoc(companyId, company_bank_statement,'bank_statement_id'),
      uploadLegalDoc(companyId, passport_id, 'passport_id'),
    ])
    .then(() => {
      // Once the upload is finished, send a success message to the admin user in the UI.
      res.send({ success: 'Legal documents are successfully uploaded.' });
    });
  });

  ...

module.exports = router;
On our Live Demo example, we’ve defined 4 input fields on the Smart Action
Upload Legal Docs on the collection companies.const { collection } = require('forest-express-mongoose');
collection('companies', {
actions: [{
name: 'Upload Legal Docs',
type: 'single',
fields: [{
field: 'Certificate of Incorporation',
description: 'The legal document relating to the formation of a company or corporation.',
type: 'File',
isRequired: true
}, {
field: 'Proof of address',
description: '(Electricity, Gas, Water, Internet, Landline & Mobile Phone Invoice / Payment Schedule) no older than 3 months of the legal representative of your company',
type: 'File',
isRequired: true
}, {
field: 'Company bank statement',
description: 'PDF including company name as well as IBAN',
type: 'File',
isRequired: true
}, {
field: 'Valid proof of ID',
description: 'ID card or passport if the document has been issued in the EU, EFTA, or EEA / ID card or passport + resident permit or driving license if the document has been issued outside the EU, EFTA, or EEA of the legal representative of your company',
type: 'File',
isRequired: true
}],
});
...

router.post('/actions/upload-legal-docs',
 (req, res) => {
    // Get the current company id
    let companyId = req.body.data.attributes.ids[0];

    // Get the values of the input fields entered by the admin user.
    let attrs = req.body.data.attributes.values;
    let certificate_of_incorporation = attrs['Certificate of Incorporation'];
    let proof_of_address = attrs['Proof of address'];
    let company_bank_statement = attrs['Company bank statement'];
    let passport_id = attrs['Valid proof of id'];

    // The business logic of the Smart Action. We use the function
    // UploadLegalDoc to upload them to our S3 repository. You can see the full
    // implementation on our Forest Live Demo repository on Github.
    return P.all([
      uploadLegalDoc(companyId, certificate_of_incorporation, 'certificate_of_incorporation_id'),
      uploadLegalDoc(companyId, proof_of_address, 'proof_of_address_id'),
      uploadLegalDoc(companyId, company_bank_statement,'bank_statement_id'),
      uploadLegalDoc(companyId, passport_id, 'passport_id'),
    ])
    .then(() => {
      // Once the upload is finished, send a success message to the admin user in the UI.
      res.send({ success: 'Legal documents are successfully uploaded.' });
    });
  });

...

module.exports = router;
On our Live Demo example, we’ve defined 4 input fields on the Smart Action
Upload Legal Docs on the collection Company.class Forest::Company
include ForestLiana::Collection
collection :Company
action 'Upload Legal Docs', type: 'single', fields: [{
field: 'Certificate of Incorporation',
description: 'The legal document relating to the formation of a company or corporation.',
type: 'File',
is_required: true
}, {
field: 'Proof of address',
description: '(Electricity, Gas, Water, Internet, Landline & Mobile Phone Invoice / Payment Schedule) no older than 3 months of the legal representative of your company',
type: 'File',
is_required: true
}, {
field: 'Company bank statement',
description: 'PDF including company name as well as IBAN',
type: 'File',
is_required: true
}, {
field: 'Valid proof of ID',
description: 'ID card or passport if the document has been issued in the EU, EFTA, or EEA / ID card or passport + resident permit or driving license if the document has been issued outside the EU, EFTA, or EEA of the legal representative of your company',
type: 'File',
is_required: true
}]
end
Rails.application.routes.draw do
  # MUST be declared before the mount ForestLiana::Engine.
  namespace :forest do
    post '/actions/upload-legal-docs' => 'companies#upload_legal_docs'
  end

  mount ForestLiana::Engine => '/forest'
end
class Forest::CompaniesController < ForestLiana::SmartActionsController

  def upload_legal_doc(company_id, doc, field)
    id = SecureRandom.uuid

    Forest::S3Helper.new.upload(doc, "livedemo/legal/#{id}")

    company = Company.find(company_id)
    company[field] = id
    company.save

    Document.create({
      file_id: company[field],
      is_verified: true
    })
  end

  def upload_legal_docs
    # Get the current company id
    company_id = ForestLiana::ResourcesGetter.get_ids_from_request(params, forest_user).first

    # Get the values of the input fields entered by the admin user.
    attrs = params.dig('data', 'attributes', 'values')
    certificate_of_incorporation = attrs['Certificate of Incorporation'];
    proof_of_address = attrs['Proof of address'];
    company_bank_statement = attrs['Company bank statement'];
    passport_id = attrs['Valid proof of ID'];

    # The business logic of the Smart Action. We use the function
    # upload_legal_doc to upload them to our S3 repository. You can see the
    # full implementation on our Forest Live Demo repository on Github.
    upload_legal_doc(company_id, certificate_of_incorporation, 'certificate_of_incorporation_id')
    upload_legal_doc(company_id, proof_of_address, 'proof_of_address_id')
    upload_legal_doc(company_id, company_bank_statement, 'bank_statement_id')
    upload_legal_doc(company_id, passport_id, 'passport_id')

    # Once the upload is finished, send a success message to the admin user in the UI.
    render json: { success: 'Legal documents are successfully uploaded.' }
  end
end
On our Live Demo example, we’ve defined 4 input fields on the Smart Action
Upload Legal Docs on the collection Company.Ensure the file app/forest/__init__.py exists and contains the import of the previous defined class :On our Live Demo example, we’ve defined 4 input fields on the Smart Action
Upload Legal Docs on the collection Company.The 2nd parameter of the
SmartAction method is not required. If you don’t fill it, the name of your smartAction will be the name of your method that wrap it.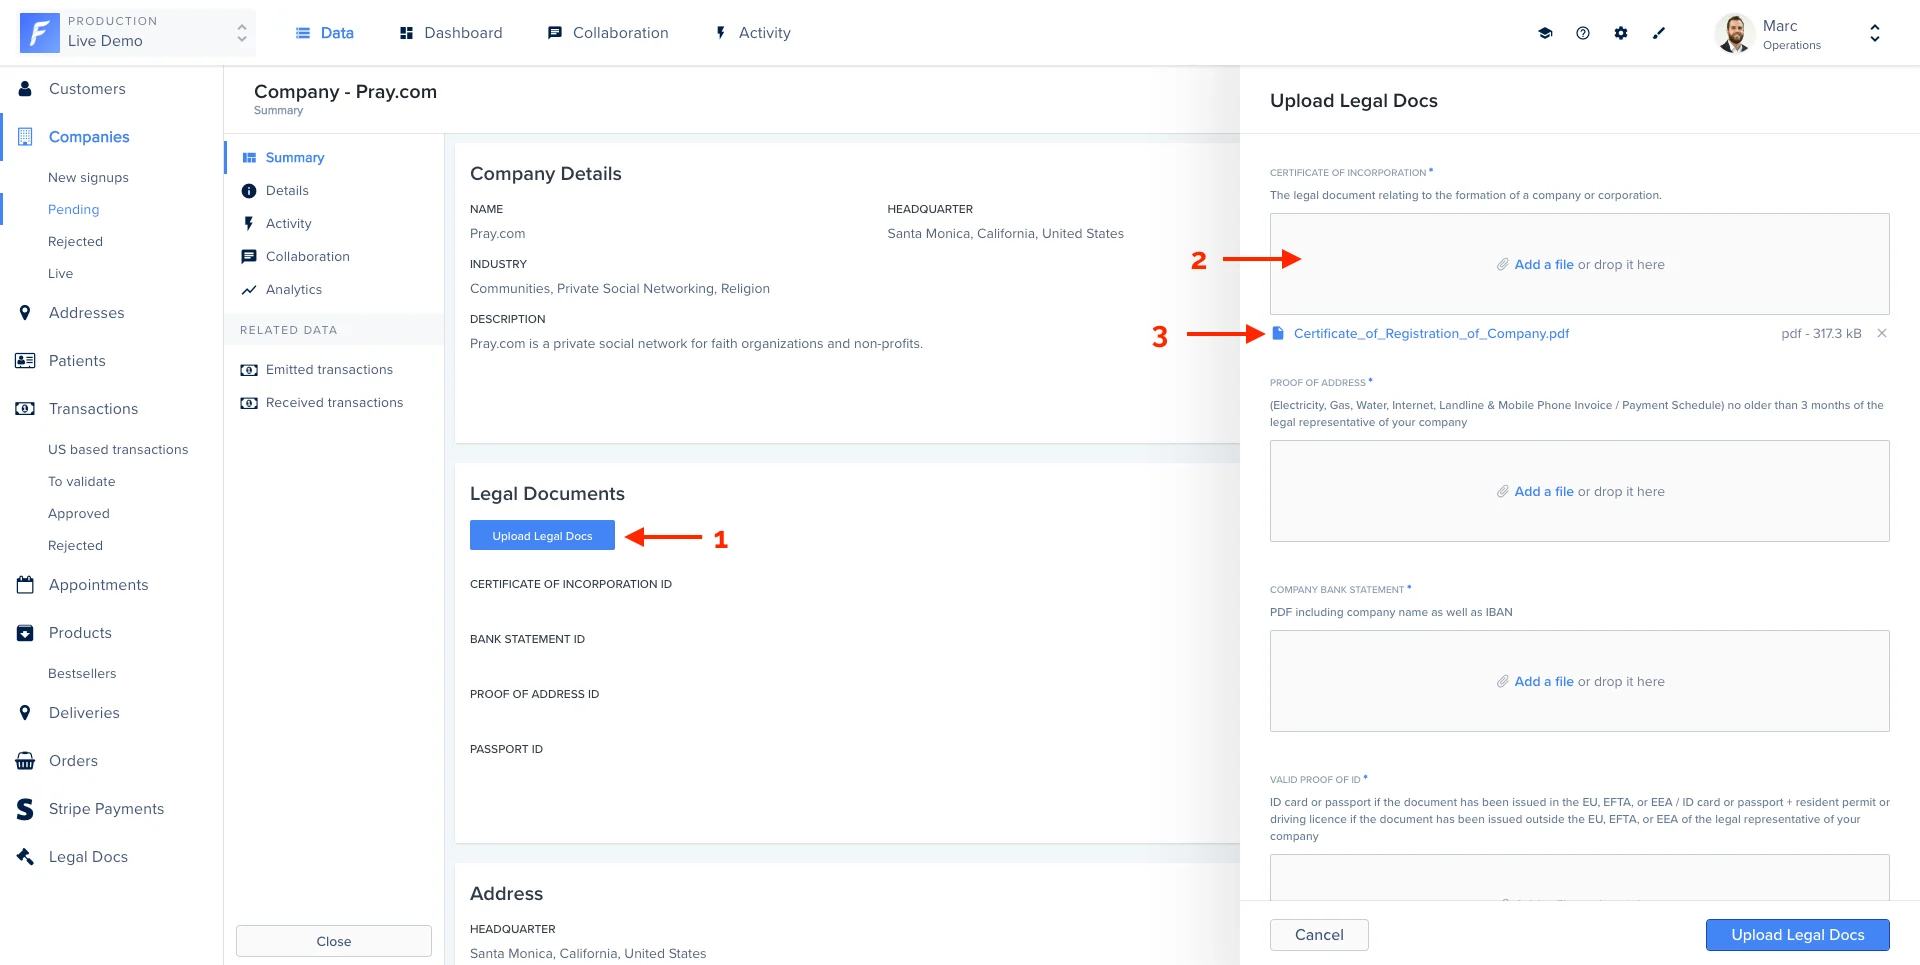
Handling input values
Here is the list of available options to customize your input form.| Name | Type | Description |
|---|---|---|
| field | string | Label of the input field. |
| type | string or array | Type of your field.
|
| reference | string | (optional) Specify that the input is a reference to another collection. You must specify the primary key (ex: category.id). |
| enums | array of strings | (optional) Required only for the Enum type. This is where you list all the possible values for your input field. |
| description | string | (optional) Add a description for your admin users to help them fill correctly your form |
| isRequired | boolean | (optional) If true, your input field will be set as required in the browser. Default is false. |
| hook | string | (optional) Specify the change hook. If specified the corresponding hook is called when the input change |
| widget | string | (optional) The following widgets are available to your smart action fields (text area, date, boolean, file, dateonly) |
The
widget property is only partially supported.
If you want to use a custom widget via a Smart Action Hook, you’ll need to use the syntax mentioned in the next section.Use components to better layout your form
This feature is only available from version 9.4.0 (
forest-express-sequelize and forest-express-mongoose) / version 9.4.0 (forest-rails) .you must define your layout in a
load hook at minima, and repeat it in each change hook.List of supported layout components
Node.js
// Page
{
  type: 'Layout',
  component: 'Page',
  elements: [] // An array of fields or other layout elements (except other pages)
},

// Row
{
  type: 'Layout',
  component: 'Row',
  fields: [] // An array of one or two fields
}

// Separator
{
  type: 'Layout',
  component: 'Separator',
}

// Html bloc
{
  type: 'Layout',
  component: 'HtmlBlock',
  content: '...' // A text content, which supports html tags
}
Example
Here’s an example of an action form with many fields, that we want to improve with some layout components, to make it easier for the end user to fill in.Node.js
const applyLayout = (fields) => {
  const fieldByName = (name) => fields.find((field) => field.field === name);
  return [
    {
      type: 'Layout',
      component: 'Page',
      elements: [
        {
          type: 'Layout',
          component: 'HtmlBlock',
          content: '<h3>Please fill in the customer details <b>first</b>, following this <a href="https://how-to-invoice.doc.example">guide</a></h3>'
        },
        {
          type: 'Layout',
          component: 'Row',
          fields: [fieldByName('firstname'), fieldByName('lastname')]
        },
        { type: 'Layout', component: 'Separator' },
        fieldByName('username'),
        fieldByName('email'),
      ]
    },
    {
      type: 'Layout',
      component: 'Page',
      elements: [
        {
          type: 'Layout',
          component: 'HtmlBlock',
          content: 'You may now enter his address details'
        },
        {
          type: 'Layout',
          component: 'Row',
          fields: [fieldByName('city'), fieldByName('zip code')]
        },
        fieldByName('country'),
      ]
    }
  ]
}

collection('customers', {
  actions: [
    {
      name: 'Send invoice',
      type: 'single',
      fields: [
        {
          field: 'firstname',
          type: 'String',
          isRequired: true,
        },
        {
          field: 'lastname',
          type: 'String',
          isRequired: true,
        },
        {
          field: 'username',
          type: 'String',
        },
        {
          field: 'email',
          type: 'String',
          isRequired: true,
        },
        {
          field: 'country',
          type: 'Enum',
          enums: [],
        },
        {
          field: 'city',
          type: 'String',
          hook: 'onCityChange',
        },
        {
          field: 'zip code',
          type: 'String',
          hook: 'onZipCodeChange',
        },
      ],
      hooks: {
        load: async ({ fields }) => {
          return applyLayout(fields);
        },
        change: {
          onCityChange: async ({ fields }) => {
            return applyLayout(fields);
          },
          onZipCodeChange: async ({ fields }) => {
            return applyLayout(fields);
          },
        },
      },
    },
  ],
  fields: [],
  segments: [],
});
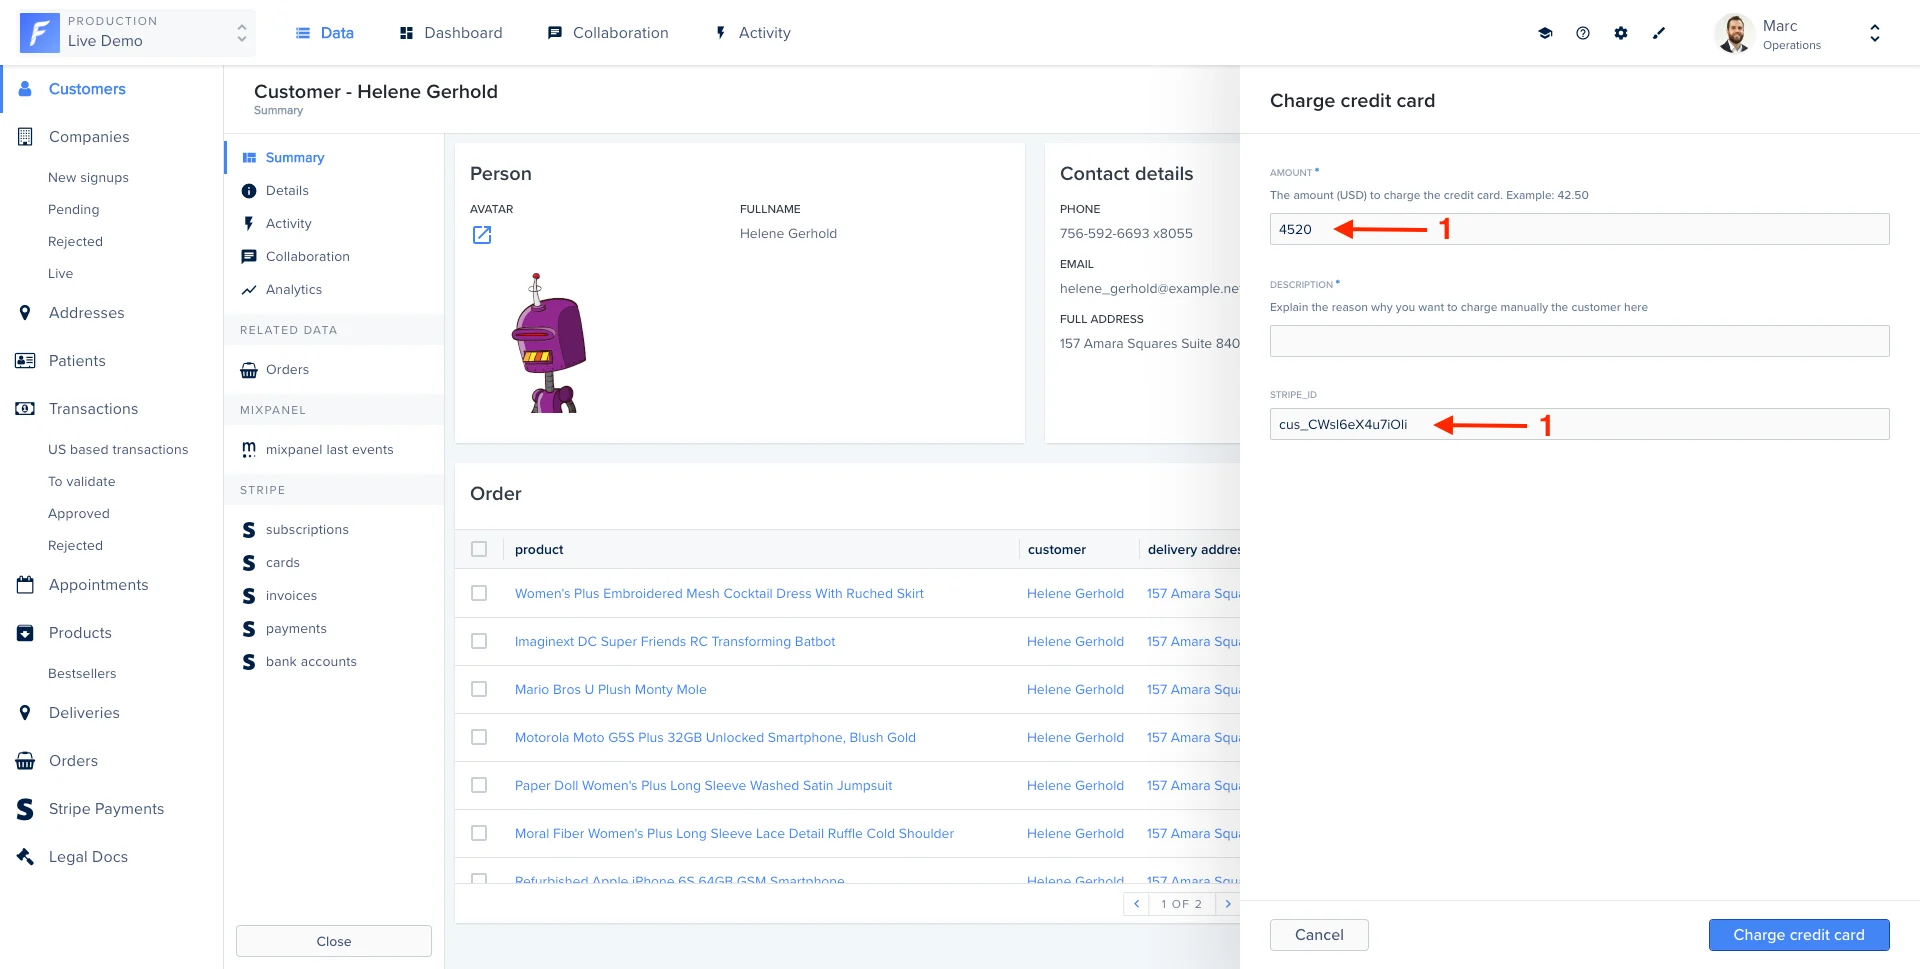
Prefill a form with default values
Forest allows you to set default values of your form. In this example, we will prefill the form with data coming from the record itself (1), with just a few extra lines of code.- SQL
- Mongoose
- Rails
const { collection } = require('forest-express-sequelize');
const { customers } = require('../models');

collection('Customers', {
  actions: [{
    name: 'Charge credit card',
    type: 'single',
    fields: [{
      field: 'amount',
      isRequired: true,
      description: 'The amount (USD) to charge the credit card. Example: 42.50',
      type: 'Number'
      }, {
      field: 'description',
      isRequired: true,
      description: 'Explain the reason why you want to charge manually the customer here',
      type: 'String'
      }, {
      // we added a field to show the full potential of prefilled values in this example
      field: 'stripe_id',
      isRequired: true,
      type: 'String'
    }],
    hooks: {
      load: async ({ fields, request }) => {
        const amount = fields.find(field => field.field === 'amount');
        const stripeId = fields.find(field => field.field === 'stripe_id');

        amount.value = 4520;

        const id = request.body.data.attributes.ids[0];
        const customer = await customers.findByPk(id);

        stripeId.value = customer.stripe_id;

        return fields;
      },
    },
  }],
  ...
});
const { collection } = require('forest-express-mongoose');
const { customers } = require('../models');

collection('Customers', {
  actions: [{
    name: 'Charge credit card',
    type: 'single',
    fields: [{
      field: 'amount',
      isRequired: true,
      description: 'The amount (USD) to charge the credit card. Example: 42.50',
      type: 'Number'
      }, {
      field: 'description',
      isRequired: true,
      description: 'Explain the reason why you want to charge manually the customer here',
      type: 'String'
      }, {
      // we added a field to show the full potential of prefilled values in this example
      field: 'stripe_id',
      isRequired: true,
      type: 'String'
    }],
    hooks: {
      load: async ({ fields, request }) => {
        const amount = fields.find(field => field.field === 'amount');
        const stripeId = fields.find(field => field.field === 'stripe_id');

        amount.value = 4520;

        const id = request.body.data.attributes.ids[0];
        const customer = await customers.findByPk(id);

        stripeId.value = customer.stripe_id;

        return fields;
      },
    },
  }],
  ...
});
class Forest::Customers
  include ForestLiana::Collection

  collection :Customers

  action 'Charge credit card',
    type: 'single',
    fields: [{
      field: 'amount',
      isRequired: true,
      description: 'The amount (USD) to charge the credit card. Example: 42.50',
      type: 'Number'
      }, {
      field: 'description',
      isRequired: true,
      description: 'Explain the reason why you want to charge manually the customer here',
      type: 'String'
      }, {
      # we added a field to show the full potential of prefilled values in this example
      field: 'stripe_id',
      isRequired: true,
      type: 'String'
    }],
    :hooks => {
      :load => -> (context) {
        amount = context[:fields].find{|field| field[:field] == 'amount'}
        stripeId = context[:fields].find{|field| field[:field] == 'stripe_id'}

        amount[:value] = 4520;

        id = context[:params][:data][:attributes][:ids][0];
        customer = Customers.find(id);

        stripeId[:value] = customer['stripe_id'];

        return context[:fields];
      }
    }
    ...
end
Making a field read-only
To make a field read only, you can use theisReadOnly property:
| Name | Type | Description |
|---|---|---|
isReadOnly | boolean | (optional) If true, the Smart action field won’t be editable in the form. Default is false |
const { customers } = require('../models');

collection('customers', {
  actions: [
    {
      name: 'Some action',
      type: 'single',
      fields: [
        {
          field: 'country',
          type: 'String',
          isReadOnly: true,
        },
        {
          field: 'city',
          type: 'String',
        },
      ],
      hooks: {
        load: async ({ fields, request }) => {
          const country = fields.find((field) => field.field === 'country');
          country.value = 'France';

          const id = request.body.data.attributes.ids[0];
          const customer = await customers.findById(id);

          // If customer country is not France, empty field and make it editable
          if (customer.country !== 'France') {
            country.value = '';
            country.isReadOnly = false;
          }
          return fields;
        },
      },
    },
  ],
  fields: [],
  segments: [],
});
Change your form’s data based on previous field values
This feature is only available from version 8.0.0 (
forest-express-sequelize and forest-express-mongoose) / version 7.0.0 (forest-rails) .- SQL
- Mongoose
- Rails
const { getEnumsFromDatabaseForThisRecord } = require('./my-own-helper');
const { getZipCodeFromCity } = require('...');
const { collection } = require('forest-express-sequelize');
const { customers } = require('../models');

collection('customers', {
  actions: [
    {
      name: 'Send invoice',
      type: 'single',
      fields: [
        {
          field: 'country',
          type: 'Enum',
          enums: [],
        },
        {
          field: 'city',
          type: 'String',
          hook: 'onCityChange',
        },
        {
          field: 'zip code',
          type: 'String',
          hook: 'onZipCodeChange',
        },
      ],
      hooks: {
        load: async ({ fields, request }) => {
          const country = fields.find((field) => field.field === 'country');

          const id = request.body.data.attributes.ids[0];
          const customer = await customers.findByPk(id);

          country.enums = getEnumsFromDatabaseForThisRecord(customer);

          return fields;
        },
        change: {
          onCityChange: async ({ fields, request, changedField }) => {
            const zipCode = fields.find((field) => field.field === 'zip code');

            const id = request.body.data.attributes.ids[0];
            const customer = await customers.findByPk(id);

            zipCode.value = getZipCodeFromCity(customer, changedField.value);

            return fields;
          },
          onZipCodeChange: async ({ fields, request, changedField }) => {
            const city = fields.find((field) => field.field === 'city');

            const id = request.body.data.attributes.ids[0];
            const customer = await customers.findByPk(id);

            city.value = getCityFromZipCode(customer, changedField.value);

            return fields;
          },
        },
      },
    },
  ],
  fields: [],
  segments: [],
});
const { getEnumsFromDatabaseForThisRecord } = require('./my-own-helper');
const { getZipCodeFromCity } = require('...');
const { collection } = require('forest-express-mongoose');
const { customers } = require('../models');

collection('customers', {
  actions: [
    {
      name: 'Send invoice',
      type: 'single',
      fields: [
        {
          field: 'country',
          type: 'Enum',
          enums: [],
        },
        {
          field: 'city',
          type: 'String',
          hook: 'onCityChange',
        },
        {
          field: 'zip code',
          type: 'String',
          hook: 'onZipCodeChange',
        },
      ],
      hooks: {
        load: async ({ fields, request }) => {
          const country = fields.find((field) => field.field === 'country');

          const id = request.body.data.attributes.ids[0];
          const customer = await customers.findById(id);

          country.enums = getEnumsFromDatabaseForThisRecord(customer);

          return fields;
        },
        change: {
          onCityChange: async ({ fields, request, changedField }) => {
            const zipCode = fields.find((field) => field.field === 'zip code');

            const id = request.body.data.attributes.ids[0];
            const customer = await customers.findById(id);

            zipCode.value = getZipCodeFromCity(customer, changedField.value);

            return fields;
          },
          onZipCodeChange: async ({ fields, request, changedField }) => {
            const city = fields.find((field) => field.field === 'city');

            const id = request.body.data.attributes.ids[0];
            const customer = await customers.findById(id);

            city.value = getCityFromZipCode(customer, changedField.value);

            return fields;
          },
        },
      },
    },
  ],
  fields: [],
  segments: [],
});
actions 'Send invoice',
  type: 'single',
  fields: [
        {
          field: 'country',
          type: 'Enum',
          enums: []
        },
        {
          field: 'city',
          type: 'String',
          hook: 'oncityChange'
        },
        {
          field: 'zip code',
          type: 'String',
          hook: 'onZipCodeChange'
        },
      ],
  hooks: {
      :load => -> (context){
        country = context[:fields].find{|field| field[:field] == 'country'}

        id = context[:params][:data][:attributes][:ids][0];
        customer = Customers.find(id);

        country[:enums] = getEnumsFromDatabaseForThisRecord(customer)

        return context[:fields]
      },
      :change => {
        'oncityChange'=> -> (context){
          zipCode = context[:fields].find{|field| field[:field] == 'zip code'}

          id = context[:params][:data][:attributes][:ids][0];
          customer = Customers.find(id);

          zipCode[:value] = getZipCodeFromCity(
            context[:record],
            context[:context][:changed_field][:value]
          )

          return context[:fields]
        },
        'onZipCodeChange'=> -> (context) {
          city = context[:fields].find{|field| field[:field] == 'city'}

          id = context[:params][:data][:attributes][:ids][0];
          customer = Customers.find(id);

          city[:value] = getCityFromZipCode(
            context[:record],
            context[:context][:changed_field][:value]
          )

          return context[:fields]
        },
      },
  }
How does it work?
Thehooks property receives a context object containing:
- the
fieldsarray in its current state (containing also the current values) - the
requestobject containing all the information related to the records selection. Explained here. - the
changedFieldis the current field who trigger the hook (only for change hook)
fields must be returned. Note that fields is an array containing existing fields with properties described in this section.If you want to use a widget inside of a hook, you’ll need to use the following syntax on your field:
- For a
text area, use{ widgetEdit: 'text area editor', parameters: {} } - For a
boolean, use{ widgetEdit: 'boolean editor', parameters: {} } - For a
dateor adateonly, use{ widgetEdit: 'date editor', parameters: {} } - For a
file, use{ widgetEdit: 'file picker', parameters: {} }
load or change hook, just set it! For instance, setting a new description for the field city:
- SQL
- Mongoose
- Rails
- Django
const city = fields.find((field) => field.field === 'city');
city.description = 'Please enter the name of your favorite city';
const city = fields.find((field) => field.field === 'city');
city.description = 'Please enter the name of your favorite city';
city = context[:fields].find{|field| field[:field] == 'city'}
city[:description] = "Please enter the name of your favorite city"
    'hooks': {
        'load': self.send_invoice_load,
    }
...

def send_invoice_load(fields, request, *args, **kwargs):
    country = next((x for x in fields if x['field'] == 'country'), None)
    country['value'] = 'France'
    return fields
Add/remove fields dynamically
This feature is only available from version 8.0.0 (
forest-express-sequelize and forest-express-mongoose) / version 7.0.0 (forest-rails).field dynamically inside the fields array, like so:
- SQL
- Mongoose
- Rails
- Django
[...]
hooks: {
  change: {
    onFieldChanged: ({ fields, request, changedField }) => {
      [...]
      fields.push({
        field: 'another field',
        type: 'Boolean',
      });
      return fields;
    }
  }
}
[...]
[...]
hooks: {
  change: {
    onFieldChanged: ({ fields, request, changedField }) => {
      [...]
      fields.push({
        field: 'another field',
        type: 'Boolean',
      });
      return fields;
    }
  }
}
[...]
:hooks => {
  :change => {
    'onFieldChanged' => -> (context) {
      [...]
      context[:fields].push({
        field: 'another field',
        type: 'Boolean',
      });
      return context[:fields];
    }
  }
}
    'hooks': {
        'change': {
            'onFieldChanged': self.on_field_change,
            'onAnotherFieldChanged': self.on_another_field_change,
        }
    }
...

def on_field_change(self, fields, request, changed_field, *args, **kwargs):
    fields.append({
        'field': 'another field',
        'type': 'Boolean',
        'hook': 'onAnotherFieldChanged',
    })
    return fields

def on_another_field_change(self, fields, request, changed_field, *args, **kwargs):
    // Do what you want
    return fields
Get selected records with bulk action
When using hooks with a bulk Smart action, you’ll probably need te get the values or ids of the selected records. See below how this can be achieved.- SQL
- Mongoose
- Rails
const { collection, RecordsGetter } = require('forest-express-sequelize');
const { customers } = require('../models');
const customersHaveSameCountry = require('../services/customers-have-same-country');

collection('customers', {
  actions: [
    {
      name: 'Some action',
      type: 'bulk',
      fields: [
        {
          field: 'country',
          type: 'String',
          isReadOnly: true,
        },
        {
          field: 'city',
          type: 'String',
        },
      ],
      hooks: {
        load: async ({ fields, request }) => {
          const country = fields.find((field) => field.field === 'country');

          const ids = await new RecordsGetter(
            customers,
            request.user,
            request.query
          ).getIdsFromRequest(request);
          const customers = await customers.findAll({ where: { id } });

          country.value = '';
          country.isReadOnly = false;

          // If customers have the same country, set field to this country and make it not editable
          if (customersHaveSameCountry(customers)) {
            country.value = customers.country;
            country.isReadOnly = true;
          }

          return fields;
        },
      },
    },
  ],
  fields: [],
  segments: [],
});
const { collection, RecordsGetter } = require('forest-express-mongoose');
const { customers } = require('../models');
const customersHaveSameCountry = require('../services/customers-have-same-country');

collection('customers', {
  actions: [
    {
      name: 'Some action',
      type: 'bulk',
      fields: [
        {
          field: 'country',
          type: 'String',
          isReadOnly: true,
        },
        {
          field: 'city',
          type: 'String',
        },
      ],
      hooks: {
        load: async ({ fields, request }) => {
          const country = fields.find((field) => field.field === 'country');

          const ids = await new RecordsGetter(
            customers,
            request.user,
            request.query
          ).getIdsFromRequest(request);
          const customers = await customers.findAll({ _id: { $in: ids } });

          country.value = '';
          country.isReadOnly = false;

          // If customers have the same country, set field to this country and make it not editable
          if (customersHaveSameCountry(customers)) {
            country.value = customers.country;
            country.isReadOnly = true;
          }

          return fields;
        },
      },
    },
  ],
  fields: [],
  segments: [],
});
class Forest::Customers
  include ForestLiana::Collection

  collection :Customers

  action 'Some action',
    type: 'bulk',
    fields: [
      {
        field: 'country',
        type: 'String',
        is_read_only: true
      },
      {
        field: 'city',
        type: 'String'
      },
    ],
    :hooks => {
      :load => -> (context) {
        country = context[:fields].find{|field| field[:field] == 'country'}

        ids = ForestLiana::ResourcesGetter.get_ids_from_request(context[:params], context[:user]);
        customers = Customers.find(ids);

        country[:value] = '';
        country[:is_read_only] = false;

        # If customers have the same country, set field to this country and make it not editable
        if customers_have_same_country(customers)
          country[:value] = customers.country;
          country[:is_read_only] = true;
        end

        return context[:fields];
      },
    },
end